NDNvideo是一个发布和播放在线视频的基于NDN的工具。代码地址:https://github.com/remap/ndnvideo
安装
该工具是基于CCNx的,采用python编写的,所以需要安装CCNx、PyCCN,以及流媒体捕获传输的工具gstreamer
官方这样描述:
Dependencies & installing:
ccnx (includes ccnr) If you plan streaming and ccnr crashes when it reaches size around 2GB create file csrc/conf/local.mk with: PLATCFLAGS= -O2 -D_FILE_OFFSET_BITS=64 -fPIC
- pyccn (git://github.com/remap/PyCCN.git)
ndnvideo (play_latest branch - git://github.com/remap/ndnvideo.git)
- gstreamer 0.10 - will NOT WORK with 1.0… must restrict packages to 0.10 for ndnvideo compatibilty.
CCNx安装:CCNx安装笔记
PyCCN
基于CCNx的python中间件,为上层应用提供python接口
源代码地址:https://github.com/named-data/PyCCN
git clone https://github.com/named-data/PyCCN.git
cd PyCCN
./bootstrap
安装需求:
- GNU automake 1.11
- GNU libtool (not sure of minimum version, using 2.2.6b)
- CCNx 0.4+
- OpenSSL (need to be linked to the same version used by libccn
- Python 2.7+ (tested with 2.7.0 and 3.2.1)
然后编译安装
./configure
make
# 可以尝试执行make check
make install
gstreamer
支持流媒体捕获和传输的包
Ubuntu安装命令:
sudo apt-get update
sudo apt-get install gstreamer0.10-plugins-ugly python-gst0.10-dev gstreamer0.10-ffmpeg
注意:如果提示没有相应的包,可以添加源地址:
用编辑器打开 /etc/apt/sources.list,在末尾添加以下内容(北邮的镜像):
deb ftp://openware.byr.edu.cn/pub/mirror/ubuntu/ precise main multiverse restricted universe
deb ftp://openware.byr.edu.cn/pub/mirror/ubuntu/ precise-backports main multiverse restricted universe
deb ftp://openware.byr.edu.cn/pub/mirror/ubuntu/ precise-proposed main multiverse restricted universe
deb ftp://openware.byr.edu.cn/pub/mirror/ubuntu/ precise-security main multiverse restricted universe
deb ftp://openware.byr.edu.cn/pub/mirror/ubuntu/ precise-updates main multiverse restricted universe
之后重新执行上述安装命令。
关于gstreamer安装完毕简单测试(官方要求):
gst-launch-0.10 videotestsrc ! ximagesink
gst-launch-0.10 v4l2src ! ximagesink
gst-launch-0.10 v4l2src ! x264enc ! ffdec_h264 ! ximagesink
# 注意:v4l2中是字母l不是数字1
注意,下面两条命令需要有音视频捕获设备才能正确执行。此外,因为 ximagesink 和 xvimagesink 所支持制式有所不同,直接使用 gst-launch-0.10 v4l2src ! ximagesink 会出现如 Could not negotiate format 错误,而如果在虚拟机中使用因为没有硬件加速故使用后者会出现 Could not initialise Xv output。经我个人测试,以下命令可以调用摄像头:
以下命令在真机、虚机均可运行
# 推荐可用
gst-launch-0.10 v4l2src ! ffmpegcolorspace ! ximagesink
gst-launch-0.10 v4l2src ! 'video/x-raw-yuv,width=400,height=300,format=(fourcc)YUY2;video/x-raw-yuv,format=(fourcc)YV12' ! ffmpegcolorspace ! ximagesink
# 比例会失真
gst-launch-0.10 v4l2src ! videoscale ! 'video/x-raw-yuv,width=400,height=300 ! ffmpegcolorspace ! ximagesink
真机可以运行命令(实验室开会用笔记本测试)
gst-launch-0.10 v4l2src ! xvimagesink
gst-launch-0.10 v4l2src ! ffmpegcolorspace ! xvimagesink
## 以下命令因为要对视频源进行编码再解密,因此反映会慢很多
gst-launch-0.10 v4l2src ! x264enc ! ffdec_h264 ! xvimagesink
关于上面命令的含义详细可参考博客:【1】http://blog.csdn.net/android_lee/article/details/6787977 【2】http://blog.csdn.net/sakulafly/article/details/21748777
此外python库:
python
import pygst
如果没有提示出错就表明安装成功
NDNvideo
直接拷贝下来:
git clone https://github.com/remap/ndnvideo.git
运行
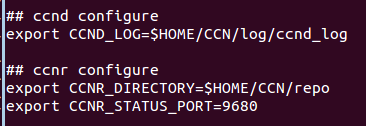
首先设置环境变量,修改 ~/.profile,在文件末尾加上:
运行CCN环境:
source ~/.profile
ccndstart
ccnr &
本地视频
因为在虚拟机中进行测试,没有相关硬件视频加速能力等,更改 ndnvideo/videostreaming/video_src.py 中相关代码( ./play.py 中调用,更改时注意备份):

原 xvimagesink 改为 ximagesink
更改 ndnvideo/videostreaming/utils.py 为以下:

发布视频:
首先进入到 ndnvideo/videostreaming/ 下执行:
./ccn_launch.py filesrc location=/home/jinpf/1.mp4 ! typefind ! qtdemux name=mux \
mux.video_00 ! queue ! VideoSink location=/jinpf/video/video \
mux.audio_00 ! queue ! AudioSink location=/jinpf/video/audio
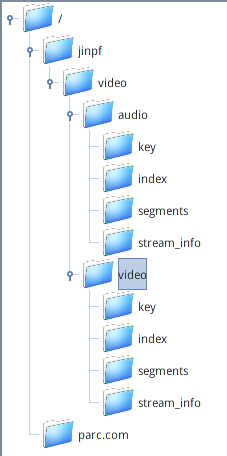
输入 ccnexplore & 显示如下:
播放视频:
# 另开一个终端,观看视频,将运行结果输出到video_log中
./play.py /jinpf | tee video_log
播放成功:
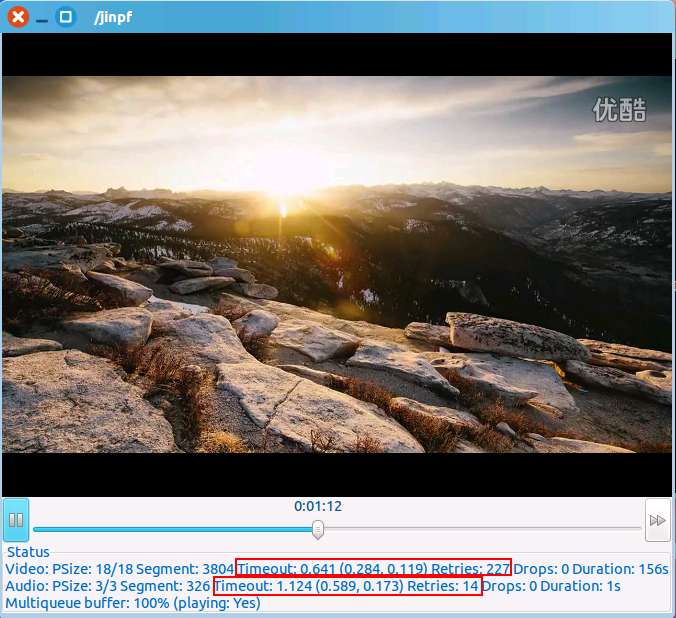
问题:
下面数据显示超时重传次数很多,多次出现进度条回退到0的现象,同时拖拽进度条不太流畅。
此外,并不是所有视频都能够播放成功,目前经测试,有视频发布成功但是播放不成功。从其提示推断应该和gstreamer有关。(关于gstreamer,我并没有太多掌握,如果有时间需要系统学习)
实时视频
需要保证摄像头可以使用。同时修改源代码 ndnvideo/videostreaming/video_sink.py :
如果之前运行过本地视频或者怕repo中存在同名文件影响后来实验可执行:
# 关闭之前CCN相关程序
ccndstop
cd $CCNR_DIRECTORY
rm -r *
ccndstart
ccnr &
发布视频:
cd ndnvideo/videostreaming/
# 一个终端发布视频:
./video_sink.py /jinpf/streaminfo/video
# 另一个终端发布音频:
./audio_sink.py /jinpf/streaminfo/audio
播放视频:
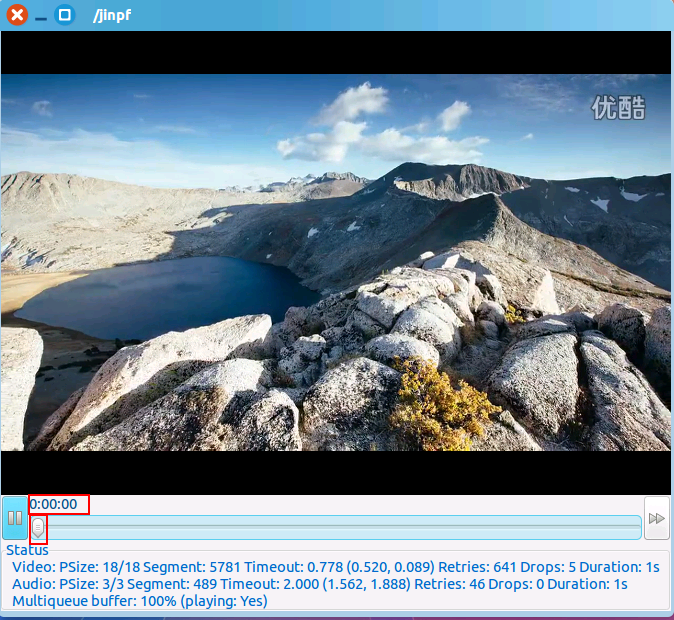
./play.py /jinpf
播放器端进度条可以拖拽到以前的画面